Monday, May 22, 2023

New black and white film developer!

There are so very many film developer options for black and white it makes my head hurt. 

Color is easy, use C-41 chemistry or go home. The only issue with color is reaching and maintaining the required fluid temperature of 102F. However, if you're willing to spend around $100 then several easy to use options become available to open up the brave new world of home color film development. Further, C-41 works for all color film emulsions and regardless of box speed, they all develop in three minutes and thirty seconds. (Note: I am sure there could be examples where that last statement is patently incorrect, I just don't know what they are.) Of course, as you continue to put rolls of color through the C-41 process you must add a few seconds to the development time to account for chemistry exhaustion but that's pretty easy. And you have to do the same for black and white chemistry reuse. For C-41 it is about 4 seconds added per roll. I just developed my eighth roll of color with the current C-41 kit I'm working through and I'm up to a total of four minutes development time. That's actually a pretty fast development time in relation to black and white development times.

As I opened with, there are seemingly endless options and combinations for black and white home development. Do you want more/less contrast? Here's a developer. Do you want sharper/less sharp negatives? Here's a developer. Do you want more/less grain? Here's a developer. And that doesn't even begin to touch on the interplay between various film emulsions and various developers. Again it makes my head hurt. That is why, upon beginning the home development journey, I opted to go the monobath route (see my earlier post on this topic). One chemistry which combines the developer, stop and fixer. Very convenient. Though intended to be used at 80F, not exactly room temperature, there are development times listed down to 70F or so. Pour in the monobath, agitate as indicated by the instructions, return the solution to its container (for reuse), pour in water and rinse, hang the negatives to dry, then scan them. Easy peasy. However...

As I gained more experience developing black and white and as I started developing color as well, I began to wonder about the wide world of black and white developers and the "traditional" development process. That process is; developer followed by a stop bath followed by fixer followed by water rinse followed by hanging followed by scanning. And as I had already become used to the two-step color process (developer followed by "Blix" -- a bleach + fix concoction), it didn't seem a reach for me to try the three-step black and white process. 

After a week or so of research I decided to go with Kodak's HC-110 developer and Photographer's Formulary TF-4 Rapid Archival Fix. Both are well regarded and have been in use for a long time. About a week later I was mixing the TF-4 into a working solution (the HC-110 is mixed up on use). The next day I developed my first roll in my "new" process (everyone else's standard process). That process is developer, stop bath (I used water), fixer, water rinse, hang, scan. Turns out it was very straightforward and I ended up, even after screwing up my development time (more on that later), with a very nice strip of negatives. I am happy with the process and will continue using HC-110 going forward.

If you go down the black and white home development path you will need to become familiar with Digital Truth Photo's "Massive Dev Chart" (https://www.digitaltruth.com/devchart.php). That chart will help you navigate the process of determining how long a particular film emulsion should be developed in a particular developer mixed at a particular solution concentration. They also have mobile apps. Highly recommended. Just pay close attention to the info you are fat fingering into the app. I messed up my data entry and was told to develop TMax 400 for seven minutes and thirty seconds at 68F. The correct development time should have been five minutes. My fault as I didn't let the app update properly and pulled off the incorrect number. Now I know and am good to go for the future. That said, the negatives turned out great. Perhaps some added contrast? Not sure until I develop another roll, at the correct time, to see how it comes out. 

The bottom line of all this chatter is that I'm happy with my decision to give up monobath development in favor of HC-110. In a few weeks I'm off on a short road trip and am planning to bring only two cameras, a Leica M3 (with 28mm) and a Canon P (with 50mm) and six rolls of black and white film. Should be fun. Looking forward to how well they develop.

See below a few of my favorite images from a recent trip to London. That roll of film was the test of my new process. Even more risky, they were shot on the Olympus XA-2 point and shoot I bought new in 1982! I replaced the light seals a few weeks before the trip, inserted a new battery, loaded it with film and brought it with me to London. To be completely transparent, it was the third string back up to my primary kit Leica M10R with a Fuji X100V backup. That said, I am happy with, and relieved by, the images that old Olympus XA-2 and the TMax 400 film development returned! 

The chandelier at the entrance inside the Victoria and Albert Museum in London


Statue on Whitehall Street in London


The Three Graces inside the Victoria and Albert Museum in London


Sunday, May 14, 2023

London!

 Just returned from an eight day visit to London as part of a Rick Steves Europe tour group. The group was 26 folks strong including our most excellent guide. This was my first visit to London and all I can say is, "wow!" We had a wonderful time. Most memorable were visits to Westminster Abby, St. Paul Cathedral and St. George's Chapel. I could actually feel the weight of history as I walked through those magnificent buildings. An additional show stopper was the trip to Greenwich to visit the Royal Observatory and to stand on the Prime Meridian. As a mariner for a majority of my professional life, navigation was one of the primary areas of expertise which was learned early on and put into practice each and every day. It was wonderful to visit Greenwich and learn how it came to be that the Prime Meridian was set there and to learn the major role accurate timepieces had in the advancement of navigation. 

The tour covered many additional sights throughout the city. From just about any location we visited, the skyline views of the city were amazing. And we also very much enjoyed how easy it was to get around. Years earlier, we had lived in downtown Tokyo and loved the ease of movement throughout that huge metropolitan. Subways, trains, buses, cabs in abundance. London is the same. It seems we were never more than an eight to ten minute (leizurely) walk to some form of transportation. Super convenient!

Armed with two digital cameras, a film camera and two iPhone 13s, between us we captured 2,000 images! While it seemed fun at the time, culling through those images a week after returning home has proven quite challenging. And in the end I want to get the pile down to about 50 (or so) images for a photo book. Wish me luck...

Prior to the trip I agonized for months on lens choice. In the end. I bought along a 15mm, 28mm and a 50mm. The 28mm and 50mm seemed like no brainers and were the lenses I used most of the time. Probably a 65/35 split with the 28mm being most used. I brought the 15mm in anticipation of interior shots, mostly at the three holy sites mentioned above. However, 15mm was just too hard for me to manage. If the sites had been empty I think I would have focused on the magnificent ceilings in those buildings. I just couldn't get out of the way of the lens. And, the distortion and perspective issues of not holding the lens perpendicular or at least level, proved my undoing. My fault for not regularly using the lens to learn how to use it effectively - lesson learned. In its place, I used my iPhone 13. At some point I will publish a ranting post on just how easily modern smart phones capture images. I have been truly amazed by some of the straight out of phone images I've taken in situations that I know my modern and very expensive digital cameras would have choked on. Certainly you can do a lot in post processing to make the camera images look equally, if not more so, amazing. But at the moment of capture, "chimping" the shot to show your family / friends, the iPhones can sometimes win. But I'll save that rant for another time.

Back to lens choice. Later this year my wife and I will again travel to Europe and I'm just now entering the period where I will begin agonizing over the perfect lens combination for the trip. A fast zoom lens would be the best choice but that isn't really an option for the camera system I am bought into. Instead, small, fast prime lenses are the choice. So, for this next trip I'm thinking a 24mm, 50mm (40mm?) and a 90mm. Why the 90mm? I noticed as I have been working through the images captured in London I am often cropping into some images to highlight a particular aspect. The 50mm was my longest lens and in some cases it just doesn't have the reach. I think the 90mm will give me the necessary reach while maintaining sensor resolution. On the shorter end, 24mm will be perfect for walking the streets in the downtown areas. I shoot a lot of architectural images and noticed in London that 28mm, although my favorite focal length, was often not quite wide enough for the scene. I am a "scenes" photographer more than I am a "subject" photographer. Better for me to capture a bit more and crop it out that to miss something I want included. I'm still thinking this through (actually, I'm agonizing over it - fear of missing out!) and have plenty of time before the trip. Regardless, between now and then I will spend a lot of time with the 24mm and the 90mm and become very comfortable with those focal lengths. 

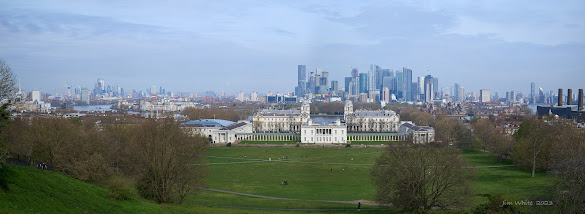
A process I did enjoy executing was shooting panos with the 50mm lens. And that is a technique I practiced before the trip to London. Shooting three or four (or sometimes just two) images, with about 30% to 40% overlap, and stitching them together in Capture One has been a game changer for me. I used to think I needed wide angle lenses for landscape (nature or urban) images. However, I believe I like shooting the 50mm better in those situations and stitching in post. More compression with the same field of view. While the images can be captured in either horizontal or vertical aspect, I tend to shoot mostly horizontal. Probably because it is most comfortable for me with the camera I use. Regardless, if you haven't tried this technique, go for it! I've also shot panos with the 90mm as well and was equally please with the results. 

Finally, several years ago I bought an Ona Bowery camera bag. Almost from when the bag arrived to my home, I began second guessing the choice as I thought it too small. And in the months leading up to the trip I became more concerned about its size in relation to the kit I was planning. So, I began taking the bag on the many photowalks I regularly take in my local downtown with some version of the kit I through I'd use in London. Often I'd return home convinced I needed a slightly larger messenger type bag. On a few occasions I nearly pulled the trigger. However, it turned out that the one camera body with a lens attached, plus the two other small, fast prime lenses, two spare batteries and a few SD cards all fit comfortably in the Ona Bowery bag. Slung cross body and carried slightly behind, I never had issues with the security of my kit and could access it very quickly on those few occasions when I wanted to swap a lens. The camera was usually on a wrist strap but even when on a neck strap there was no interference with the Ona Bowery. I'll admit it looks a bit like a man-purse but I decided to be brave and not worry about how it looked. Turns out that with its small size, and in black, it is mostly invisible. And it fit into the backpack I hand carried onto my flights there and back. I'm not sponsored by anyone but I will say that if you are looking for a small bag for your camera kit, take a look at the Ona Bowery.

Below are just a few of my favorite images.


The Lloyd's (of London) building.


The Gherkin (30 St Mary Axe)


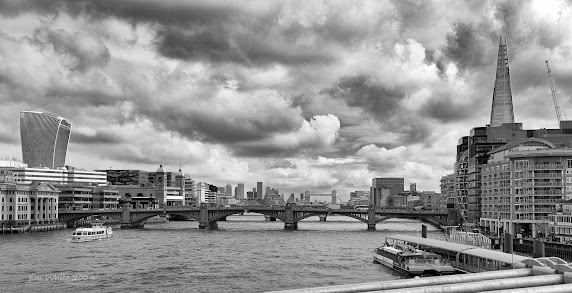
 Looking up the Thames from the Millennium Bridge on a cloudy day


The National Maritime Museum from the Royal Observatory at Greenwich (50mm pano)


The Tube